Changing Canon Printer MAC Color Settings
These days we have a wide variety of technical devices around us. Be it working on a computer or with a printer, we get an option to choose between various brands and models available in the market. They are all sophisticated devices with a lot of features.
However, sometimes working with these machines becomes little tricky. They offer so many options and features that we tend to get lost and do not understand how to go ahead with what we are aiming at. One such task is to change Canon printer color setting on Mac. Though the printer setting is not difficult to do, it is good to know all the steps before you start. We provide here a list of steps that would enable you to complete this task will all ease.
Efficacious Steps to Change Canon Printer Color Setting on Mac
The quality of printout is dependent on many factors. The type of printer paper used in the printer matters. Also, setting the printer control is responsible for the control of ink flow on the printout. Let us look at the steps to change Canon printer color setting.
Step 1: To start with go to the ‘File’ menu. You will get to see an option ‘Print’ under this menu. Select this and you would be able to open the ‘Print’ dialog box.
Step 2: As you select ‘Printer’, you would get a pop-up menu on your screen. There would also be a list of printers to choose from. Find the printer that you are using and select the same.
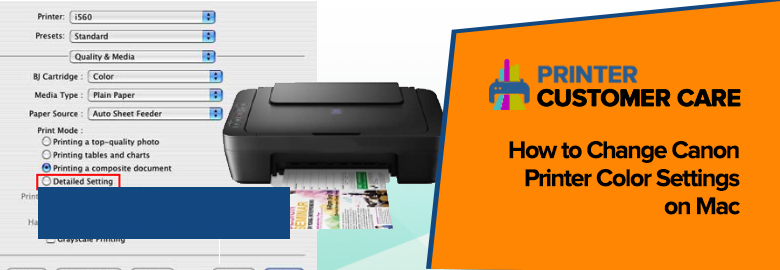
Step 3: Now, in the next pop-up menu, you should select the option ‘Quality & Media’.
Step 4: The next step for you is to select ‘Detailed Setting’. This is a radio button under the ‘Print Mode’ section.
Step 5: It is time now for you to make adjustment to the print quality and also to the print speed. You should do this using the ‘Print Quality’ slide bar.
Step 6: You should remember that if you want to improve the quality of your printouts, then you have to move the slide bar towards the right. And if you want to make the speed of the printing faster, then you have to move the slide bar towards the left.
Step 7: After you are done with the desired printer setting, you should click ‘Print’ and check if the printing is appropriate.
We are sure that all these steps would enable you to get quality printing done at the preferred speed. In case you feel that the setting still needs to be adjusted, do call us.
Customer Service
We offer you the best of services and support. Our experts are there to help you any time of the day. Feel free to call our Canon talented pool of experts at Tool-Free Number  who are available 24/7 to make your printing effortless. Just leave your worries aside and let our experts handle the printer setting for you. We are sure to give you complete satisfaction with our services.